HC12: Connecting to Hardware
In the part of the tutorial, we will show how to connect and configure
the Elektronikladen ComPOD/NG BDM pod for use with an MC9S12DP256 target.
Our target board is the Axiom Adapt9S12.
If you are using a different BDM pod, a different HC12 variant -
or even NoICE for another processor family, you will still find useful
information here. Then try NoICE help on setting up and using
If you haven't done so already, we recommend that you go through
Running NoICE for the first time before
reading this part of the tutorial.
Installing and Connecting the BDM Pod
- Turn off power to the target.
- Tie the MODA and MODB pins of your target to ground (Single Chip
mode). If your board is a commercial development board, there are likely to be
jumpers or DIP switches for MODA and MODB. Consult your board's documentation.
If you are using these pins as port pins, you may need extra
circuitry to hold the pins low during reset.
In conjunction with the BDM pod, MODA=MODB=0 allows NoICE to start the chip
in Special Single Chip mode. If you
start in any other mode, the processor will begin executing instructions
immediately, and NoICE may not be able to control it.
- Connect the pod to the BDM connector on your target. Be sure to orient
the connector correctly, or damage to the pod or the target board may result.
Pin 1 on the BDM cable is almost always indicated by a red stripe on the
edge of the cable.
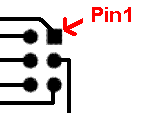
Pin 1 of the BDM connector on the target board is often indicated by a
"1" on the silk-screen. If not, look on the back of the board. Pin 1
is usually indicated by a square pad as shown in the diagram.

- Connect the serial cable from the ComPOD to your PC.
- Turn on power to the target.
- Run NoICE.
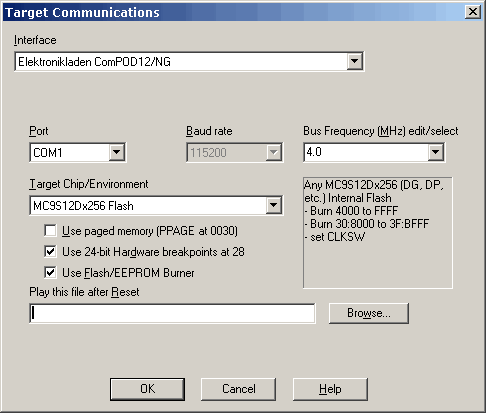
- Select "Target Communications" from the "Options" menu.
- From the "Interface" drop list, select "Elektronikladen ComPOD / NG"
 |
- Select the appropriate serial port. The baud rate of the ComPOD is fixed.
- Set Bus Frequency to match the target. Our board has an 8 MHz crystal,
so the bus frequency is 4 MHz. (Even if you plan to enable the PLL later, set
Bus Frequency to the initial frequency out of reset.)
- Select our Target Chip: MC9S12Dx256 Flash (this includes the DG, DJ, DP, and DT256)
- The DP256 can use memory paging (PPAGE) to get beyond 64K. We won't use that
feature in this example.
- We want to debug in Flash, so check "Use Hardware Breakpoints" and "Use Flash/EEPROM Burner"
|
- Press "OK".
|
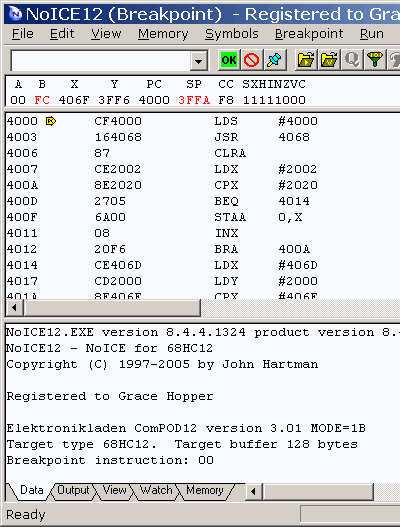
Press "OK" in the Target Communications dialog, and NoICE will show an initial
display like that shown below. If you exit NoICE and come back in, you will
return right here.
In this case, memory contains a previously-burned program. Since the
reset vector contains 4000, that is where PC starts out. NoICE disassembles from
the PC.
At this point, you may wish to repeat the simulator examples
on real hardware.
|

|
The next step is to burn a program into Flash. This example uses
ImageCraft ICC12,
as described in the previous section of the tutorial, Compiling for Source-level Debugging.
You can follow along even if you don't have this compiler. All files necessary for
you to run the NoICE demo may be downloaded here: hellofoo.zip.
Setup for other compilers is generally similar.
|
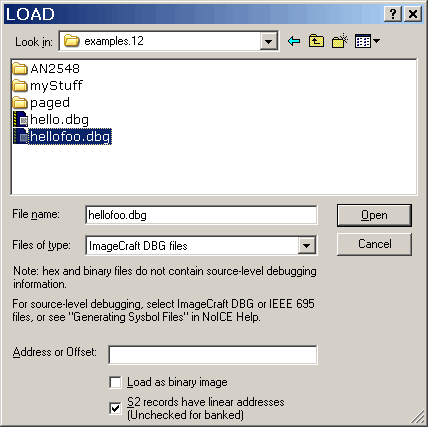
Run NoICE. Select "File", "Load...".
By default, you will see hex files such as hellofoo.s19. You could load that, but
all you would get would be disassembly, as the s19 file doesn't contain any symbolic
debug information.
So change the "Files of type" to"ImageCraft DBG files".
Be sure that the check-box labeled "S2 records have linear addresses" is checked.
This must be checked if the "linear" setting was used in ICC12. If must be unchecked if
the "CPU/Banked" setting was used in ICC12.
Navigate to hellofoo.dbg and press "OK".
NoICE help on LOAD
More on "linear" versus "banked"
|
 |
|
When you Load the file into the Flash range, a progress dialog appears:
It shows the address being burned and the progress of the burn.
|
 |
Once burning is completed, you can continue with the
source-level debugging example
NoICE help
NoICE help on all supported BDM pods
|


